Showing posts with label Recipes. Show all posts

2.07.2013

brown butter + sea salt + chocolate chip cookies.

a couple weeks ago, I stumbled across a gal on Instagram who had posted a picture of these cookies she'd made.  I couldn't get the image out of my mind, nor the combination of the words brown butter, sea salt, and chocolate, so I finally broke down and asked her for the recipe.  she said it was from the food blog, Ambitious Kitchen.

upon seeing the word "ambitious," my shoulders immediately slumped.

truthfully, when it comes to food related business, I don't consider myself the ambitious type at all.  I prefer recipes that are easy, simple (as in they don't require a mile-long list of ingredients), and most importantly, aren't overly time consuming.  because let's face it.  with all the demands that come with raising a (large) family, I don't have time to be fussing in the kitchen for hours on end.  the quicker I can throw something together, the faster I can escape out of the house to catch a break.  or, you know, something like that.

well, being the sucker that I am for anything chocolate, plus, coupled with the latest sea salt rage, I decided to look up the recipe anyway.  much to my delight, the only step that involved a little more monkey business was browning the butter.  even still, it added just a few extra minutes onto the time it normally takes me to make cookies.  totally doable.

and oh my goodness.  believe me when I say it's worth the extra effort.  like, seriously!  how have I lived to be 36 and never heard of brown butter?  once browned, it takes on a nutty aroma.  this enhances the flavor of the cookies tremendously!

hands down, the most amazing chocolate chip cookie I've ever tasted.  like, ever.      


Ingredients:
  • 2 1/4 cup all-purpose flour
  • 1 1/2 teaspoons baking soda
  • 1/2 teaspoon of sea salt, plus more for sprinkling
  • 2 sticks (1 cup) unsalted butter (I used salted)
  • 1 1/2 cups packed dark brown sugar (I used light)
  • 1/4 cup granulated sugar
  • 1 large egg plus 1 egg yolk
  • 2 teaspoons vanilla extract
  • 1 Tablespoon plain Greek yogurt
  • 3/4 cup semi-sweet chocolate chips
  • 3/4 cup milk chocolate chips
Instructions:
  1. Whisk together the flour, baking soda, and salt in a bowl and set aside. Melt butter in a saucepan over medium heat. The butter will begin to foam. Make sure you whisk consistently during this process. After a couple of minutes, the butter will begin to brown on the bottom  of the saucepan. Continue to whisk and remove from heat as soon as the butter begins to brown and give off a nutty aroma. Immediately transfer the butter to a bowl to prevent burning. Set aside to cool for a few minutes.
  2. With an electric mixer, mix the butter and sugars until thoroughly blended. Beat in the egg, yolk, vanilla, and yogurt until combined. Add the dry ingredients slowly and beat on low-speed just until combined. Stir in the chocolate chips.
  3. Chill your dough for 2 hours in the refrigerator, or place in freezer for 30 minutes if you are super eager.
  4. Once dough is chilled measure 1/4 cup of the dough into a ball. It doesn’t have to be perfectly rolled. Place dough balls on cookie sheet, 2 inches apart and sprinkle each dough ball with a little bit of sea salt.
  5. With your oven set to 350 degrees, bake the cookies 9-11 minutes or until the edges of the cookies begin to turn golden brown. They will look a bit underdone in the middle, but will continue to cook once out of the oven. Cool the cookies on the sheets and sprinkle with a little extra sea salt if desired. Remove the cooled cookies from the baking sheets after a few minutes and transfer to a wire rack to cool completely.
*side note: I used my large cookie scoop to measure the cookie dough instead of 1/4 cup like the recipe says.  to me, 1/4 cup sounded rather big.

delicious with a cold glass of milk!  enjoy!

-jessica 

2.08.2012

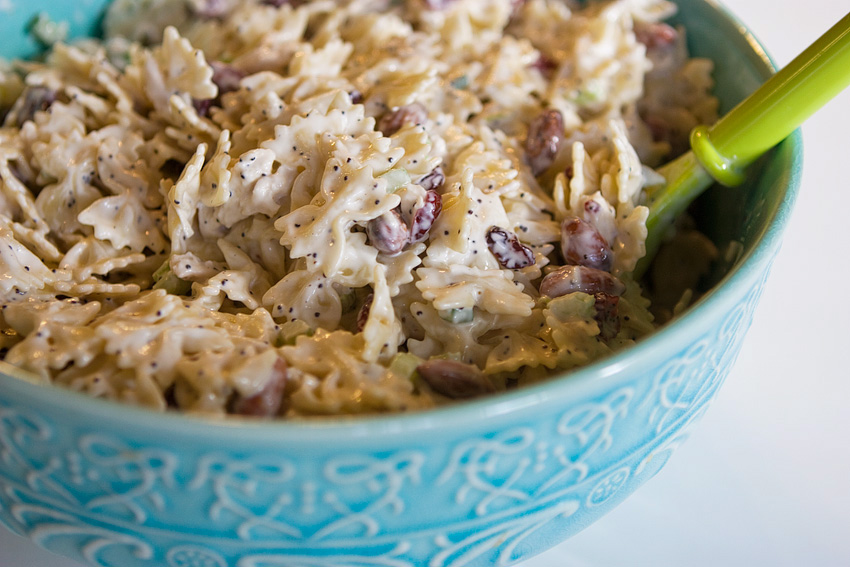
D'Amico and Sons Chicken Pasta Salad.

I haven't shared a recipe in a while so I decided to designate today, February the eighth, to do just that.  so, I apologize if you came here secretly hoping to read stories about poop, only to find out that you have to suffer through another boring recipe post instead.  well, I promise I'll be quick.

I first tasted this pasta salad at my baby shower last summer, and I liked it so much that I've made it on several different occasions.  because one, it's easy.  and two, it's wonderfully delicious.  and I don't know about you guys, but in my books that equates to a win-win situation.  easy, plus delicious?  quick, sign me up!

(recipe courtesy of my aunt Barb who got it from her cousin Ruth who held D'Amico and his Sons hostage until they handed over the recipe.  actually, I have no idea.  I just made that last part up.)

D'Amico and Sons Chicken Pasta Salad:

-1 lb bowtie pasta cooked and chilled (may also use spiral, or any larger pasta)
-1 1/2 cups rotisserie chicken (shredded or diced, whichever you prefer)
-1 cup dried cherries (I used cherry flavored Craisins)
-1 bunch green onion, chopped
-2 celery stalks, minced
-1 cup whole smoked almonds (or plain old sliced almonds would do the trick as well)

Dressing: (if possible, make in advance for a more enhanced flavor and to allow time to chill)

-1/2 cup powdered sugar
-2 Tbsp wine vinegar
-2 cups mayo
-2 Tbsp cold water
-2 Tbsp poppy seeds
-2 tsp salt
-1/2 tsp pepper

mix dressing ingredients together and add to salad right before serving.


YUM.

in other exciting news, I'm heading down to Phoenix tomorrow to visit a good friend of mine who's here on vacation.  she (along with her hubby and kiddos) moved from Minnesota to Alaska around the same time we moved from Minnesota to Arizona, almost three and a half years ago.  we figured since they were moving, we might as well move too.  well, not really.  that's just how things happened to go.

sadly, due to unfortunate circumstances (hello! Alaska is located at the opposite end of the earth practically!) our paths have not crossed since.  we've kept in contact throughout the years via calling and text messaging, but now I'm really, REALLY looking forward to catching up in person.  can't wait!

until next time!

-jessica

12.09.2011

count your blessings, not your calories.

did you know that the average person gains anywhere from one to two pounds during the holiday season?  this surprised me a little, because for some reason I would've thought it to be more?  but then again, I suppose not everyone stuffs themselves silly like I do.

this year, my goal is to up that average by a pound or two.  I'm hoping that by sharing a yummy cookie recipe with you, it will enable you to pack on more than just one measly pound.  because seriously.  to me, that just doesn't seem like a sufficient amount of weight gain.  in fact, it sounds like people are going through the holiday season hungry, even.  so if you dare, read on.  (oh come on, I promise it'll be fun!)

like me, do you love sugar cookies, but don't like to go through the hassel of making them?  the chilling, the rolling, the cutting-out, it's very tedious and time-consuming work, isn't it.  (just say yes!)  and with the holiday season already so busy, who wants to waste all that precious time slaving away in the kitchen when you could be out shopping or attending Christmas parties instead?  (side note: those people that say they enjoy baking?  don't believe it ;-)

enter the sugar cookie that doesn't need to be chilled, rolled, or cut-out.  for once in your life, something is actually easy.

I stole the ornament idea from Ashley Ann.  we used these as a table centerpiece for the girls' Christmas party.  so festive!
don't they look delightful?  especially delicious with a dab of almond-flavored icing on top.  (or plain old frosting would be good, too!)  bet you can't wait to sink your teeth into these soft, buttery bits of goodness, right?  what?  are you saying I should just shut up already and give you the recipe?  geez, you guys are so demanding.

Sugar Cookies

  • 1 cup powdered sugar
  • 1 cup granulated sugar
  • 1 cup butter
  • 2/3 cup oil
  • 2 eggs
  • 1 tsp vanilla
  • 4 1/4 cups flour
  • 1 tsp salt
  • 1 tsp baking soda
  • 1 tsp cream of tartar

beat sugars, butter and oil until fluffy.  add eggs and mix well.  stir in dry ingredients.  roll into balls and press flat with bottom of glass dipped in sugar.  bake at 350 for 10 minutes.  I told you it was EASY.

Almond Icing

  • 1 cup powdered sugar
  • 2 tsp light corn syrup
  • 1/4 tsp almond extract
  • add milk or half and half to desired consistency

thanks to me, you can now spend less time making cookies, and more time eating them.

enjoy!

-jessica

PS. today is Gary's birthday, which means he's officially an old man 40 years-old.  him and Jake went skiing at Snowbowl today-- apparently, if it's your birthday, you can ski free (bummer for you, summer birthday people!)  hmph, some people have all the fun.  oh well.  I'll console myself with the fact that I'm still a young whippersnapper.  ha.

10.03.2011

apple update.

I suppose you've been wondering what on earth we've been doing with 65 pounds of apples?  I mean, aside from the fact that they've made everyone around here "regular," and all that jazz.*

*in the past few weeks, our toilet paper consumption has more than tripled.

what?  you could care less about a pile of apples?  well then, my sincere apologies, because Imma tell you anyway.  and you never know, it just might involve a recipe... or three.

*insert dangling carrot*

I know.  when it comes to luring people in, I'm pretty much pro.  just ask my husband.  psst, once you have them hooked, go straight for the jugular.  although sometimes it can get a little messy.  YOU SPENT HOW MUCH ON THAT PURSE?!?  

whatever.  at least a purse is more useful than, um... er... uh... well, I was going to say an elk mount, only he doesn't hunt (minor detail.)  or fish.  or golf.  or... shoot.  what does he even do?  oh yeah, that's right.  he hiked the Grand Canyon with his buddies a couple years ago.

apparently he takes the words "till death do us part" to heart.

anyway, if you can remember alllll the way back to last fall (I know, hard), I posted THIS apple crisp recipe (courtesy of my friend Mia.)  wow, is it ever scrumptious!  I love that the topping is not too dry and crumbly, nor too hard and crunchy.  and that it has just the right amount of sweet, cinnamon and buttery flavor.  and well... mmm.  it's a must try.  we've made at least four pans of it already.

but wait, I'm not done yet.  in one of our church cookbooks, I came across this killer homemade caramel sauce, which we drizzled on top of the apple crisp and ice cream. three words: TO DIE FOR.  it's the "icing on the cake," if you will.  especially delicious with a Chai Tea Latte.  because I NEED all those extra calories, remember?     


here's the recipe:

Caramel Sauce

-1/2 cup butter
-1 cup brown sugar
-1/2 tsp salt
-1/2 cup evaporated milk
-1 tsp vanilla

combine butter, sugar and salt together and bring to a boil.  remove from heat and stir in evaporated milk and vanilla.

*************************************

ALSO.  for breakfast on Saturday, we whipped up a batch of oatmeal-apple pancakes complete with homemade apple-cinnamon syrup.  beware: it's like indulging in a slice of apple pie straight out of bed.  can you say sweet?  your blood sugar will thank you.

I may or may not have devoured this entire stack single handedly.
here are those recipes:

Oatmeal-Apple Pancakes

-1 cup oatmeal
-1-1/3 cups water
-2 eggs
-2 cups buttermilk
-1/2 cup butter, melted
-2 cups flour
-1 Tbsp sugar
-2 tsp baking powder
2 tsp baking soda
-2 apples, finely chopped

combine oatmeal and water.  let stand at least 10 minutes.  beat eggs, stir in buttermilk, butter, and oatmeal mixture.  combine dry ingredients and stir into egg mixture.  fold in apple.  fry on hot griddle.

Apple-Cinnamon Syrup

-1cup water
-2 cups sugar
-2 cups applesauce, approximately (we used homemade)
-cinnamon to taste

combine water and sugar and cook until it reaches a full, rolling boil.  remove from heat and stir in applesauce and cinnamon.

it's like turning pancakes and waffles into apple pie!  seriously!

enjoy!  oh.  and get your fall flag out and wave it around.  I love this time of year!

-jessica

7.21.2011

blueberry jam.

one of the best things about summer is being able to enjoy a variety of seasonal, fresh fruit.  after buying apples, bananas, and oranges all winter long (because I'm not about to fork over $5 for an *extra* small container of strawberries in February, are you kidding?), sinking my teeth into a juicy peach, or devouring a handful of plump blueberries is a much welcomed treat.

I would have to say my favorites are the berries, namely strawberries, raspberries, blackberries, and blueberries, did I miss any?  high in antioxidants and low in sugar, I find myself adding them to a lot of things; granola, oatmeal, yogurt, salads, pancakes and waffles, or simply scarfing them by the handful makes for a great afternoon pick-me-up, as well.  either way, you can't go wrong.

when it coms to making jam, I've mainly stuck to the basic strawberry freezer variety, because that's what the kids seem to prefer.  I don't know about you guys, but after making the same thing over and over again, I tend to get a little burnt out.  so when I came across this blueberry jam recipe, I was more than anxious to try it out, or broaden my horizons, if you will.

initially, the kids wrinkled their noses at it.  and I quote, "ewww, mom, that looks disgusting," they all said, as they shoved their fingers down their throats and made fake puking noises. ( lol, I totally remember doing that as a kid... like, GAG me.) I shrugged my shoulders and simply replied, "great, all the more for me."

I betcha it wasn't two days later when I caught Myra red-handed, spreading a generous layer on her PB & J sandwich.  she looked a little sheepish, but then admitted, "I guess this stuff IS good."

can I get a resounding, "I TOLD YOU SO?"

especially delicious on homemade waffles and on top of bagels and cream cheese.  YUM.

here's the recipe:

secretly simple blueberry jam

-5 cups blueberries
-1/2 cup sugar
-1 Tbsp fresh lemon juice
-1/4 tsp kosher salt

in a medium saucepan, combine the blueberries, sugar, lemon juice, and salt.  mash with a potato masher or wooden spoon until the berries have released their juices.

cook over medium-high heat, stirring occasionally, until the mixture has thickened, 18 to 25 minutes.  transfer to containers and refrigerate for up to 1 month or freeze for up to 1 year.

tip: this recipe can also be made with two 10-ounce bags of frozen blueberries instead of fresh.  cook the frozen berries for 2 to 3 minutes before mashing, then reduce the total cooking time to 15 to 17 minutes.

mmm, juicy homemade preserves that can be made without canning equipment?  SPREAD THE WORD.

-jessica

7.01.2011

berry delicious popsicles.

I honestly wasn't going to spout off today, but I decided this treat was rather fitting for the upcoming Fourth of July holiday, and I just couldn't keep it a secret.  I had to share it with you.  HAD to.  because I'm nice like that.

really there's no science to making this.  it's just plain old vanilla yogurt with a little strawberry and blueberry puree swirled in.  easy peasy.  believe me, I got a C in science and even I was able to whip this up.

oooh, look at those gorgeous colors.  it's just so patriotic, isn't it?  sigh.  good thing you can't hear me belting out my rendition of the Star Spangled Banner right now because trust me, you'd be scarred for life.   


mm-mmm, good.  a delicious and refreshing (and healthy!) summer treat.

strawberry puree:

-2 pints strawberries
-1/4 cup sugar
-juice of 2 lemons

put above in blender and puree until smooth. 

blueberry puree:

-1 1/2 pints blueberries
-1 cup sugar
-1 Tbsp fresh lemon juice
-1 cup water

in saucepan, mix blueberries and sugar.  add water and bring to boil.  reduce heat and simmer for 15 minutes.  put mixture in blender and puree until smooth.  add lemon juice.

(*optional: for both of these purees, you can put them through a sieve for a smoother sauce.)

pour desired amount of puree into the yogurt, mix it up and freeze.  I just used good old Dixie cups-- 500 count for $2.00.  looks like we'll be making popsicles every day for the next ten years, so what?

both these recipes made more puree than was actually needed for the popsicles, but we used the extra on our buttermilk pancakes last night.  it was YUMMY.  I mean, you make breakfast for dinner, don't you?    

enjoy!

-jessica

PS. did you notice the little addition (literally) to my blog title?  what do you think-- yay or nay?

4.15.2011

classic mac and cheese.

because it's Friiiiday (YAY!), and I've got a ton of things on my plate today, how about I share a recipe with you?  sound good?  yes?  sweet, I'm glad you're all so agreeable!

I made this last Sunday for dinner and it was absolutely scrumdelicious!   is that even a word?  anyway, I'm pretty sure I heard a few grandmas going "tsk, tsk, mac and cheese?  where's the roast and potatoes, child?"  well, consider this the modern day Sunday meal.  heh.    

I admit I was a little skeptical when the recipe said to boil the pasta for only 5 minutes.  5 minutes, huh?  but, during the baking, the overabundance of cheese sauce soaks into the pasta, finishing it to just the right texture.  Mmm-mmm.  added bonus: the kiddos gobbled it up.

*note: if you're not crazy about that sharp cheddar flavor, try either medium or mild.

here's the recipe:

Classic Mac and Cheese

Yield: 8-10 servings
Ingredients:
For the bread crumb topping:
2 tbsp. unsalted butter
¾ cup panko bread crumbs
1 tsp. dried parsley
Salt and pepper

For the pasta:
1 lb. pasta shapes
6 tbsp. unsalted butter
2 cloves garlic, minced
1 tsp. dry mustard
¼ tsp. cayenne pepper
6 tbsp. all-purpose flour
2¼ cups low-sodium chicken broth
3½ cups milk
1 lb. colby jack cheese, shredded
8 oz. extra sharp cheddar cheese, shredded
Ground black pepper

Directions:
To make the bread crumb topping, melt the butter in a medium skillet over medium heat.  Add in the panko and cook, stirring frequently, until the bread crumbs are a light golden brown.  Remove from the heat and stir in the parsley.  Season with salt and pepper to taste.  Set aside to cool.

Preheat the oven to 400˚ F.  Bring a large pot of salted water to boil.  Add the pasta to the water and cook just until it begins to soften, about 5 minutes.  Drain the pasta and leave in the colander.

Return the pot to the heat.  Melt the butter over medium-high heat.  Stir in the garlic, dry mustard, and cayenne, cooking just until fragrant, about 30-60 seconds.  Whisk in the flour and cook, stirring constantly, until golden, about 1 minute.  Whisk in the chicken broth and milk and continue to heat, stirring frequently, until the mixture bubbles and thickens slightly, about 10 minutes.  Remove from the heat.  Stir in the cheeses, whisking until completely melted.  Season with salt and pepper to taste.  Stir the drained pasta into the cheese sauce.

Pour the pasta and cheese mixture into a lightly greased 9 x 13″ baking dish.  Sprinkle with the bread crumb topping.*  Bake 30-35 minutes, until the sauce is bubbling and the bread crumbs are golden brown.  (You may want to place a baking sheet on the rack underneath the baking dish to catch any sauce that bubbles over.)

*At this point, the dish can be wrapped tightly with foil and refrigerated for up to 2 days.  To serve, bake covered at 400˚ F until the filling is hot throughout, about 40-45 minutes.  Remove the foil and continue to bake until the breadcrumbs are crisp, 15-20 minutes more.


have a great weekend!

-jessica

3.18.2011

Keith's green chile machaca.

*machaca: juicy, shredded beef with onions and green peppers; used in both breakfast and regular burritos.

I have a brother-in-law.  his name is Keith.  Keith is an excellent cook.  or is it chef? (is there a difference between the two? or are they interchangeable. do I even care? not really.) anyway, Keith's specialty is slow-cooking, and he has it down to a science.  whether it's beef brisket on the "barbie," or pork in the crockpot-- you name it, he can turn an ordinary, run-of-the-mill hunk of meat into a delectable feast for your taste buds.

earlier this week, I got a bee in my bonnet to try out this recipe of his.  so, I put a roast going in the crockpot, setting it to cook overnight.

quick tangent.  I realize that cooking roasts on low for 10+ hours is key in order to get that tender, fall-off-the-bone, finger-licking good meat.  BUT. there's something just a little unsettling about waking up at 8 a.m. to the smell of beef and onions wafting throughout the house.  coffee, yes.  beef, no. coffee AND beef?  a definite NO.  so I decided that next time around, I'll shove the crockpot out in the garage.  that way, the kids can suffer instead. oops!  did I say kids?  I meant critters, my bad.  kids, critters, what's the diff?  end of tangent.

okay, so Keith has a (much younger) brother.  his name is Gary.  oh wait, that would be my husband.  though Gary may not be quite as savvy as Keith is in the kitchen, he's always willing to give his all, throw his weight around, pitch in, you get the idea.  plus, he can whip up some mighty mean buttermilk pancakes.  now where was I heading with this?  oh yeah.  so it was Gary who shredded the roast the next morning before heading off for work, while I lazed in bed.  isn't he nice?  so later, all I had to do was whip together the salsa, make the rice, fill the tortillas, bake them, and chop up the lettuce and tomatoes, all while the kids' noise and activity level threatened to tear the roof off the house.  I tell ya, cooking has NEVER been more relaxing!

anyway, they turned out divine.  and no one made gagging sounds, even.  bonus!

here's the recipe:

Green Chile Machaca

  • 3 lbs boneless beef chuck roast
  • 2-3 lbs boneless pork roast
  • 1 large onion, sliced
  • 2 (4 oz) cans chopped green chilies 
  • 2 cups beef broth
  • 3 tsp dry mustard
  • 2 Tbsp minced garlic
  • 2 tsp Adobo seasoning (I used chipotle chile pepper seasoning (found in spice aisle) instead)  
  • 2 tsp fresh ground pepper
  • 2 cups salsa (for the recipe go HERE. I highly recommend using homemade over store bought, and this recipe takes just 5 minutes, pinky promise.)
Place meat in crockpot.  Cover meat with remaining ingredients, except salsa.  Cover and cook on low 8-10 hours. (meat should be tender and easy to pull apart.) Remove meat from crockpot and set liquid aside.  Shred meat and mix with salsa and 2 cups of the cooking liquid.  Use as filling for burros, enchiladas, tacos, etc.

real quick, I'll walk you through the process for making the burros.  since the shredded meat had sat in the fridge all day, I pulled it out and warmed it up on the stove, adding the cooking liquid and salsa at that time.  I then filled the tortillas (I like La La's brand, 12 inch size), placed them on a baking sheet and baked them for about 20 min at 350, just enough to heat through and crispen up the shell a bit.

while they were baking, I heated the enchilada sauce (I prefer green) separately on the stove.  personally, I don't like baking the burros with the enchilada sauce on top, simply because they seem to get so soggy.  after removing the burros from the oven, I then poured on the enchilada sauce, sprinkled on shredded cheese and added a dollop of sour cream.  easy as that!

serve with shredded lettuce, diced tomatoes, guacamole, salsa, refried beans, etc.  I made PW's Mexican Rice as an accompaniment.  easy and delish!

I'm so not a foodie photographer.
have a great weekend! (I survived spring break! YESSS!)

-jessica

PS. just a quick reminder: there's still a few days left to enter the giveaway for a $35 gift card to CSN Stores.  go HERE!

1.20.2011

now this is what I call addicting.


I made this homemade caramel corn for our family game night on Christmas Eve and I've been craving it ever since.  the stuff disappeared faster than you can say "pass the bowl please, I want more."

and because I'm feeling kinda sorta nice today, I thought I'd share this SUPER EASY recipe with you.

Caramel Corn:
  • 35-40 cups popped popcorn (depends on if you want it more caramel-y or not)
  • 2 cups brown sugar
  • 1 cup better, melted
  • 1/2 cup light Karo corn syrup
  • 1 tsp salt
  • 1 tsp vanilla
  • 1 tsp baking soda
pour popped popcorn into big brown paper bag (like the kind you find at the grocery store).  Melt 1 cup butter and add brown sugar, Karo syrup and salt.  Boil on low heat for 5 minutes.  Remove from heat and add soda and vanilla (be careful, once you add the soda the mixture starts bubbling and expanding, almost like it comes alive EEK! your kids will find this amusing, especially if you scream.)  Pour caramel over popcorn and stir with wooden spoon until well blended.  Pour onto 2 cookie sheets and bake at 200 for 1 hour.

enjoy!

-jessica

PS. just wondering if any of you ever tried the recipes I've shared?  I know a "few" of you have, but it would be nice to get some more feedback (ahem) to see if the recipes interest you or if you're like oh joy, just another dumb and boring recipe post.  I know I can't even come close to competing with the Pioneer Woman.  so, from the deepest part of my heart where all the burps come from, thank you for your input.

11.18.2010

harvest loaf muffins.

 pumpkin meets chocolate and falls in love

and everyone lived happily ever after. 
  
the end. 


fantastically delicious.  seriously. 

trust me on this one.

recipe courtesy of Keilah.  in fact she recently started a blog, so head on over and say hi!  she's got "little bits of this and a lot of that" going on!

-jessica

10.21.2010

wherein I admit I'm a lunatic.

um, yeah.  so in the past couple of days, I've managed to a.) somehow correlate dead birds with life and b.) explain how aspens reproduce.

WHAT!   

so feel free to call the loony bin and let them know that there's this lady in Flagstaff who has completely LOST HER MARBLES.   

there, I said it.   

so now, why don't we just erase those last two posts from our memories and pretend they never happened.  agreed?

good.

now that we're back on the same wave length, I would like to present a topic that's a bit on the lighter side.  and I promise it's not even remotely related to dead birds or reproducing trees.  nope.  today I'm here to talk about cake.  more specifically,  luscious four-layer pumpkin cake.

now if this doesn't toot your horn, I don't know what will.


oh now doesn't this look absolutely heavenly?  rich, creamy filling nestled in between layers of pumpkin cake, topped off with a drizzling of caramel and chopped pecans ARE YOU DROOLING YET?  a fabulous fall dessert!

and the best part?  people will gasp and call you amaaaazing when you make it for your next get-together.  and you can just smile and politely agree because no one will have to know how little time you actually spent putting it together.  it's THAT easy.

PS. just don't put the layers on upside down like I did.  duh!

.......................................................................................................................................................................................

here's the recipe:


Luscious Four-Layer Pumpkin Cake

  • 1 pkg. (2-layer size) yellow cake mix
  • 1 can (15 oz.) pumpkin, divided
  • 1/2 cup milk
  • 1/3 cup oil
  • 4 eggs
  • 1-1/2 tsp. pumpkin pie spice, divided
  • 1 pkg (8 oz.) cream cheese, softened
  • 1 cup powdered sugar
  • 1 tub (8 oz.) Cool Whip whipped topping, thawed
  • 1/4 cup caramel ice cream topping
  • 1/4 cup chopped pecans
HEAT oven to 350

BEAT cake mix, 1 cup pumpkin, milk, oil, eggs and 1 tsp. pumpkin pie spice in large bowl with mixer until well blended.  Pour into 2 greased and floured 9-inch round pans.

BAKE 28-30 min. or until toothpick inserted into centers comes out clean.  Cool in pans 10 min.  Remove from pans to wire racks; cool completely.

BEAT cream cheese in medium bowl with mixer until creamy.  Add sugar, remaining pumpkin and spice; mix well.  Gently stir in Cool Whip.  Cut each cake layer horizontally in half with serrated knife; stack on serving plate, spreading cream cheese filling between layers. (Do not frost top layer.) Drizzle with caramel topping just before serving.  Refrigerate leftovers.
.........................................................................................................................................

enjoy!

-jessica

FYI. there is a recipe tab at the top of the page.  by clicking on that you can view all the recipes I've posted.


10.14.2010

fall in love with fall.

gotta love the award winning title.  I'm on a roll, huh?   

but it's true, though.  I'm pretty sure fall has to be my favorite season.  

mostly because I love when the days turn cool and the nights, crisp.  it's invigorating to be outside when the air has a chilly bite to it. and just to cozy up in a sweater once again.  pure bliss. 


having spent the majority of my life in Minnesota, (where the weather consists of 80% of your conversations and long underwear is considered sexy) I remember quite clearly the annual trips to the apple orchard each fall.  I have fond memories of hay rides, caramel apples and sipping hot apple cider while watching the kids frolic around in the pumpkin patch and squeal with laughter as they fed rotten apples to the goats.

well, except for that one time when I was happily munching on a nice, juicy apple only to discover it had worms.  YES worms!  uh, excuse me, I just threw up a little.  but yes, worms aside, heading to the orchard was always a fun fall activity to do as a family.


unfortunately here in Arizona, we don't have the pleasure of heading to the orchards for a bag of fresh apples.  instead we have to be content with buying them from the local grocery stores, after they've sat in some truck for who knows how long.   

well, they still taste fine.  especially after being coated with a heap of brown sugar, cinnamon and butter!


oh what would fall be without warm apple crisp?  add a dollop of whipping cream on top and mmm... comfort food at its finest.

.....................................................................................................................................................................

here's the recipe:

  • 4-5 baking apples (a variety is best)
  • 1/2 cup flour
  • 1/2 cup quick oatmeal
  • 3/4 cup brown sugar
  • 1 tsp cinnamon
  • 5 1/2 Tbsp butter, softened
Grease 8x8 baking pan.  Peel and slice fruit and place evenly in pan.  Sprinkle cinnamon on apples.  Mix the remaining ingredients together and sprinkle evenly over apples.  Bake at 375 for 50 minutes, or until apples are soft.

.....................................................................................................................................................................


enjoy!   

and like wow!  the picture is so huge it feels like I'm sitting in the bowl! :D

-jessica

9.30.2010

raise your hand if you love chocolate.

I'm pretty sure the entire population of women just raised their hands.

if you didn't, then may I suggest a shrink?  kidding.

remember back when I did the CSN giveaway where I asked you to share your favorite cake/frosting combo?  yeah, that left me drooling for days afterwards.  anyway, after I announced Denise as the winner, it seemed only fair that she would share her recipe for Chocolate Raspberry Torte with me.

well, I finally had the chance to make it last weekend.

oh my it was amazing!  and chocolatey!  and richer than me!

although I'm not sure if it turned out right or not.

and now you're all saying really? why's that?

well you see, after I removed the cake from the oven and inverted it onto the wire rack, it was oh roughly the thickness of a graham cracker.  yeah, no lie.

upon further examination of this rather skinny cake, I deduced that I had either a.) completely lost my baker's touch (not that I had much to begin with) or b.) no idea what a torte was.

so I quickly raced to the computer and googled it.  and this is what I found out:

Torte: A dense cake that includes nuts, wheat, dried fruits, sometimes rum, and is not a light and fluffy cake as would occur with baking powder or baking soda.

and then it said: Tortes are a popular choice for groom’s cakes. what, so men are dense and women are light and fluffy?

okay, so a torte was supposed to be dense.  so maybe I'm not as dense in the head as I initially thought.

I'll let you be the judge.  does this torte qualify me as the next Martha Stewart?

hey, don't choke on your coffee now.

IMG_8837

IMG_8838

IMG_8850
YUM!

.............................................................................................................................

here's the recipe:

Chocolate Raspberry Torte

* 1 cup butter, softened

* 2 cups sugar

* 4 eggs

* 1 teaspoon vanilla extract

* 1-1/2 cups all-purpose flour

* 1/3 cup baking cocoa

GLAZE:

* 1/4 cup boiling water

* 4 teaspoons raspberry gelatin

* 2 tablespoons seedless raspberry jam

TOPPING:

* 2 cups (12 ounces ) semisweet chocolate chips

* 2 cartons (8 ounces each) frozen whipped topping, thawed

* 2 cups fresh raspberries

Directions:

* Line a greased 15-in. x 10-in. x 1-in. baking pan with waxed paper; grease the paper. In a large bowl, cream butter and sugar until light and fluffy. Add eggs, one at a time, beating well after each addition. Beat in vanilla. Combine flour and cocoa; gradually beat into the creamed mixture. Transfer to prepared pan.

* Bake at 350° for 20-25 minutes or until a toothpick inserted near the center comes out clean. Cool for 5 minutes before inverting onto a wire rack to cool completely. Carefully remove waxed paper.

* For glaze, stir water and gelatin until dissolved. Stir in jam. Brush evenly over bottom of cake. Trim edges; cut cake widthwise into thirds.

* For topping, in a microwave, melt chips; stir until smooth. Fold in half of the whipped topping until blended; fold in remaining whipped topping (mixture will be thick).

* Place one cake layer on a serving platter; spread with 3/4 cup topping. Repeat layers; top with remaining cake. Frost and decorate with raspberries and remaining topping. Yield: 12 servings.

.............................................................................................................................

enjoy!  and thanks, Denise!

-jessica

PS. we are anxiously awaiting the arrival of grandma and grandpa Kesti today.  they will be in Flagstaff for six weeks!  the kids are so excited, it's like christmas around here!  they will finally get to meet Scarlett, their 67th grandchild.  can't wait!

9.01.2010

the best chocolate chip cookies.

ever.  period.

and maybe some of you already use this recipe, but that's okay.  these cookies are so yummy, it's worth repeating.

................................................................................................................................................................

here's the recipe:

best chocolate chip cookies 

  • 2 1/4 cups flour
  • 1 tsp. baking soda
  • 1 cup butter, softened*
  • 1/4 cup white sugar
  • 3/4 cup brown sugar
  • 1 tsp. vanilla
  • 1 3oz. package instant vanilla pudding (to clarify: just use the dry pudding mix, don't actually make the pudding)
  • 2 eggs
  • 12 oz. chocolate chips

combine flour and baking soda; set aside.

combine butter, sugars, vanilla, and pudding mix and beat until smooth and creamy.

beat in eggs.

gradually add flour mixture.

stir in chocolate chips.

bake at 375o for 10-12 minutes. (I pull mine out a tad under-done and then let them sit on the pan for a minute or so.)

*for high altitude, substitute 1/2 cup butter with 1/2 cup shortening.  then you won't end up with cookies that look like pancakes.

F1239552

I use pampered chef's large cookie scoop for dropping the dough onto the cookie sheet.  fast and easy.

F3002624

tempted?  all that's missing is a glass of milk.

trust me.  you won't be disappointed.

............................................................................................................................................................

and if you are fortunate enough to have a little helper cookie monster like I do, then you don't have to worry about inhaling the whole batch single-handedly.

F2341184copyF2311104copy

F2461952copy

F2371328copy  F2431744copy 

F2609920copy
 (looks like they passed QC.)

although after one bite you might just be tempted to lock yourself in your room and eat them all up.  and then when your kids ask, "hey didn't you make cookies?"  you can say, "cookies!  WHAT COOKIES?"  

"I never made any cookies."

enjoy!

-jessica

6.30.2010

sweet treats.

warning:
*the following post may contain inappropriate foods for those of you that are watching your figure.  if that's the case, then I highly advise you read this with your eyes closed.
............................................................................................................................................................
as part of our summer schedule, I've been setting aside one day a week (usually thursdays) for the older kids to do some baking.  they have been expressing an interest in baking for quite some time now, so I figured why not?  it keeps them occupied (sometimes for the whole afternoon), and keeps my freezer stocked with snacks.  and when my 7 year old exclaims he's hungry for the 80th time, I can say fine! have a cookie or two...or ten.  the little ones even get involved, mostly by offering their spoon-licking services and asking for handouts.  

they haven't quite mastered the art of "cleaning up as you go" yet.  it's not easy to see my "territory" turn into a war zone of sorts, so during this time I try busy myself with some other mundane task and simply avoid the kitchen altogether. that way, everyone stays happy.
they've made quite a variety of treats; from cookies and bars to desserts and granola, but by far the most favorite were these yummy ice cream sandwiches.
IMG_4268


IMG_4298


can you say sinful?
believe you me, it took huge amounts of willpower to keep from reaching into the freezer for one of these chocolate babies every time I made my way into the kitchen.  I finally had the kids move them to the upright freezer in the garage because at least that involved a couple more steps to get to them. (although that didn't really stop me.)
so, would you like the recipe?  or would you rather not be tempted?
since I'm feeling evil, meet your fate:
............................................................................................................................................................
Chocolate-Marshmallow Ice Cream Sandwiches
  • 10 miniature caramel Twix bars
  • 1 two layer size chocolate cake mix
  • 2 eggs
  • 1/4 cup vegetable oil
  • 1/4 cup water
  • 2 cups chocolate ice cream
  • 2/3 cup marshmallow creme

1. Unwrap Twix bars; place in resealable plastic bag.  Seal and freeze 2 hours.
2. Meanwhile, to prepare cookies, preheat oven to 350o F.  In mixing bowl combine cake mix, eggs, oil and water.  Beat with electric mixer until combined. Drop dough by well-rounded teaspoons onto ungreased cookie sheets.  Bake about 10 minutes or until tops are set.  Cool 1 minute on cookie sheets. Remove cookies; cool completely on wire racks.
3. Spoon ice cream into large bowl.  Let stand 10 minutes to soften slightly. Meanwhile using a rolling pin, crush frozen Twix bars.  Stir into ice cream; return to freezer until ready to use.
4. Spread marshmallow creme on flat sides of half of the cookies.  Using a small ice cream scoop, place some ice cream mixture onto flat sides of remaining cookies.
5. Gently sandwich cookies together and freeze for 2 hours or until firm.  Serve immediately or wrap each sandwich in plastic wrap and freeze for up to 1 month. (but whose would last that long, I wonder?)
makes about 14 sandwiches
(I doubled the recipe.)
............................................................................................................................................................
YUM!
-jessica

6.15.2010

Scarlett's baptism.

it was a most lovely June evening.
IMG_4218 copy 
with the most lovely sponsors: Loren (the invisible guy) and Jess, Ronda (holding Scarlett) and Jeff and Mona.  actually, Loren isn't really invisible.  he just wasn't there, in case you were wondering.
before looking at this next picture, you may want to quickly run and grab your shades. 
IMG_4216 
see?  don't say I didn't warn you.  I sincerely apologize if you were blinded by my glowing white legs.  I forgot to apply my spray tan prior to the picture.  oops.  and I'll blame Kim, the photographer, for adding 10 pounds on me.  Kim, what were you thinking?  hee.  
anyway, here we all are, minus Hannah.  she was at her aunt and uncle's babysitting for the week.  can you find Scarlett?  poor thing all scrunched over like that.  I hope she can survive this big family.
IMG_4253
IMG_4248 copy
forever the jokester, Gary is (on the left) attempting to pick me up.  I quickly informed him that was not such a great idea if he ever wanted to walk again. looks like Scarlett failed to see the humor in it as well.  she already knows to ignore her dad's quirky ways.  
I'm also wondering what possessed me to tilt my head so much in the photo on the right???  okay, so I really, REALLY dislike pictures of myself.  I don't know how to act on that side of the camera.  aside from being and looking like a dork.
here are a few of Scarlett in her gown that grandma Kesti made so many years ago before I had Hannah.  this made for it's 9th appearance.  wow!
IMG_4230 

IMG_4232 

IMG_4242 copy

IMG_4200
feeding Scarlett beforehand in hopes she would behave...and she did.  phew. 
and then there were the cupcakes.  baked and decorated by Clara, chef extraordinaire.  take a moment to feast your eyes on these decadent treats.
IMG_4199
IMG_4176IMG_4168

IMG_4181IMG_4179

IMG_4187 
of course we had to go all out.  Kim and I whipped up these cute cupcake toppers for that extra fun touch.  
but, oh, it was the frosting that made them totally phenomenal.  yum.  and because I'm feeling nice (and evil), I'll share the recipe with you.  hehehe.
Whipped Cream Cheese Frosting


  • Servings: 24
  • Preparation Time: 30
  • 1 (3 ounce) package cream cheese, softened
  • 1/4 cup butter, softened
  • 1 1/2 - 3 cups confectioners' sugar
  • 1 tbsp. whole milk
  • 1/2 teaspoon vanilla extract
  • 1/8 teaspoon salt

DIRECTIONS

In your mixer, whip butter and cream cheese together until smooth and fluffy, about 3 minutes on med-high speed.

Add 1 cup of the sugar and whip until combined.

Add milk, vanilla and salt. Whip until combined.

Add another cup of sugar and whip. From here, add 1/2 cup at a time until the frosting has reached your desired consistency. (I believe I used 3 cups total.)

Turn you mixer to high and whip for about a minute.

*Note: this makes just enough for 24 cupcakes. If you like more frosting on your cupcakes, make a double-batch of this frosting.

Assembly

Pipe frosting onto cooled cupcake.

Sprinkle with pink sprinkles.


..........................................................................
 delicious on pink velvet cupcakes.  enjoy!
-jessica
*disclaimer* I assume zero responsibility if this adds 10 pounds on your figure. :)

4.21.2010

a taste of the orient.

remember these?  I know you were drooling over them, so I thought I'd share the recipe.  
IMG_2265

they were sooo yummy!  perfect for dinner or a luncheon.  do people still do those?  I kind of forgot about luncheons living here in Flagstaff.  I suppose I could invite Ruth and Kristi every week.  they probably wouldn't even complain. and a huge thank you to Deb for emailing this recipe to me.
............................................................................................................................................................
here's the recipe:
Asian Chicken Salad
6 servings
  • chicken skewers with peanut sauce (see recipe below)
  • 1/4 medium head Napa cabbage, shredded
  • 1/4 medium head red cabbage, shredded
  • mixed greens and spinach
  • 2 large carrots, shredded
  • 1/2 cucumber, julienned
  • 1/2 cup slivered almonds, toasted
  • 1 can mandarin oranges, drained
  • 3 green onions, chopped
  • 1/2 bunch cilantro, coarsely chopped

Dressing:
  • 1/4 cup rice vinegar
  • 1/4 cup sesame oil
  • 3 green onions, chopped
  • 2 cloves garlic, minced
  • 2 Tbsp white sugar
  • 2 Tbsp ground ginger
  • 2 Tbsp soy sauce
  • 1 Tbsp vegetable oil
  • 1 tsp ground coriander
  • 2 tsp prepared yellow mustard

Whisk together dressing ingredients until sugar is dissolved.  serve with salad.
Chicken Skewers with Peanut Sauce
  • 1/4 cup Kraft Catalina dressing
  • 3 Tbsp peanut butter
  • 1 Tbsp soy sauce
  • 1 lb boneless, skinless chicken tenderloins (or enough for two per person)
  • 2 Tbsp dry roasted peanuts, chopped

MIX dressing, peanut butter and soy sauce in large bowl until well blended.  Add chicken; toss to coat.  Cover; refrigerate 10 minutes to marinate.
PREHEAT broiler.  Remove chicken from marinade.  Thread chicken evenly onto 8 soaked wooden or metal skewers.  Place on rack in broiler pan.
BROIL, 4-6 inches from heat.  4 minutes on each side or until cooked through. Serve sprinkled with peanuts.
............................................................................................................................................................
enjoy!  and I promise, you won't have to dress up like these two either.
IMG_2264

-jessica

4.07.2010

when life hands you lemons.

   
IMG_2161

don't just stand there and cry like a baby.
make these superb lemon bars!
IMG_2175

hey...I'm talking about lemons, not apples.  silly boy!
anyway, being it's now officially spring, I wanted to share a recipe that seemed fitting for the season.  and there's nothing more refreshing (think warm, sunny days ahead) than that little hint of lemon.  it might even make you pucker up, causing your significant other to jump for joy!  oh goody.
............................................................................................................................................................
here's the recipe:
Creamy Lemon Squares
Prep: 25 min.  |  Total: 2 hours 48 min. (incl. refrigerating)
  • 20 Nilla Wafers, finely crushed
  • 1/2 cup flour
  • 1/4 cup firmly packed brown sugar
  • 1/4 cup (1/2 stick) cold butter
  • 1 pkg. (8 oz.) cream cheese, softened
  • 1 cup granulated sugar
  • 2 eggs
  • 2 Tbsp. flour
  • 3 Tbsp. grated lemon peel
  • 1/4 cup fresh lemon juice
  • 1/4 tsp. baking powder
  • 2 tsp. powdered sugar

PREHEAT oven to 350.  Line 8-inch square baking pan with foil, with ends of foil extending over sides of pan; set aside.  Combine wafer crumbs, 1/2 cup flour and the brown sugar in medium bowl.  Cut in butter with pastry blender or two knives until mixture resembles coarse crumbs; press firmly onto bottom of prepared pan.  Bake 15 minutes.
MEANWHILE, beat cream cheese and granulated sugar with electric mixer on medium speed until well blended.  Add eggs and 2 Tbsp. flour; mix well.  Blend in 1 Tbsp of the lemon peel, lemon juice and baking powder; pour over crust.
BAKE 25 to 28 minutes or until center is set.  Cool completely.  Cover and refrigerate at least 2 hours or overnight.  Sprinkle with powdered sugar and garnish with remaining grated lemon peel, if desired, just before cutting into squares to serve.  Store leftover squares in refrigerator.
............................................................................................................................................................
IMG_2195

blissfully sweet and a little tart, these lemon squares are simply amazing!  sadly, mine don't look quite as pretty as the ones in the magazine.  nothing ever does. why is that?  are their pictures fake?  I bet that's what it is.  pfft...cheaters.
enjoy!
-jessica